Conway Game Of Life
A common piece of advice on how to best learn a new development language is to build an application. For example, you often see variants on ‘hello world’ to start with and then folks try progressively more challenging endeavours. This technique follows the well trodden path of crawl, walk, run and, maybe, matharons ( I guess the equivalent in these times of AI assistants would be taking a metaphorical taxi to speed up the journey ).
I’m not sure where Creating Conway Game of Life as your first ever React project would be placed on that road - likely at the far end where you’re sweating , exhausted and general just want to take yourself off to a dark room for several hours to comtemplate your life choices.
Did I mention my experience of JS is somewhat basic ?
For those of you who already have experience in this area, there are likely to be moments of ‘Why did you do that?!!’. Afterall , a little knowledge is dangerous.
But remember what we are always told - it is all about the outcome.

Here’s my journey
An overview
Lets follow tradition and start at the beginning with a brief description of the expectations for this application.
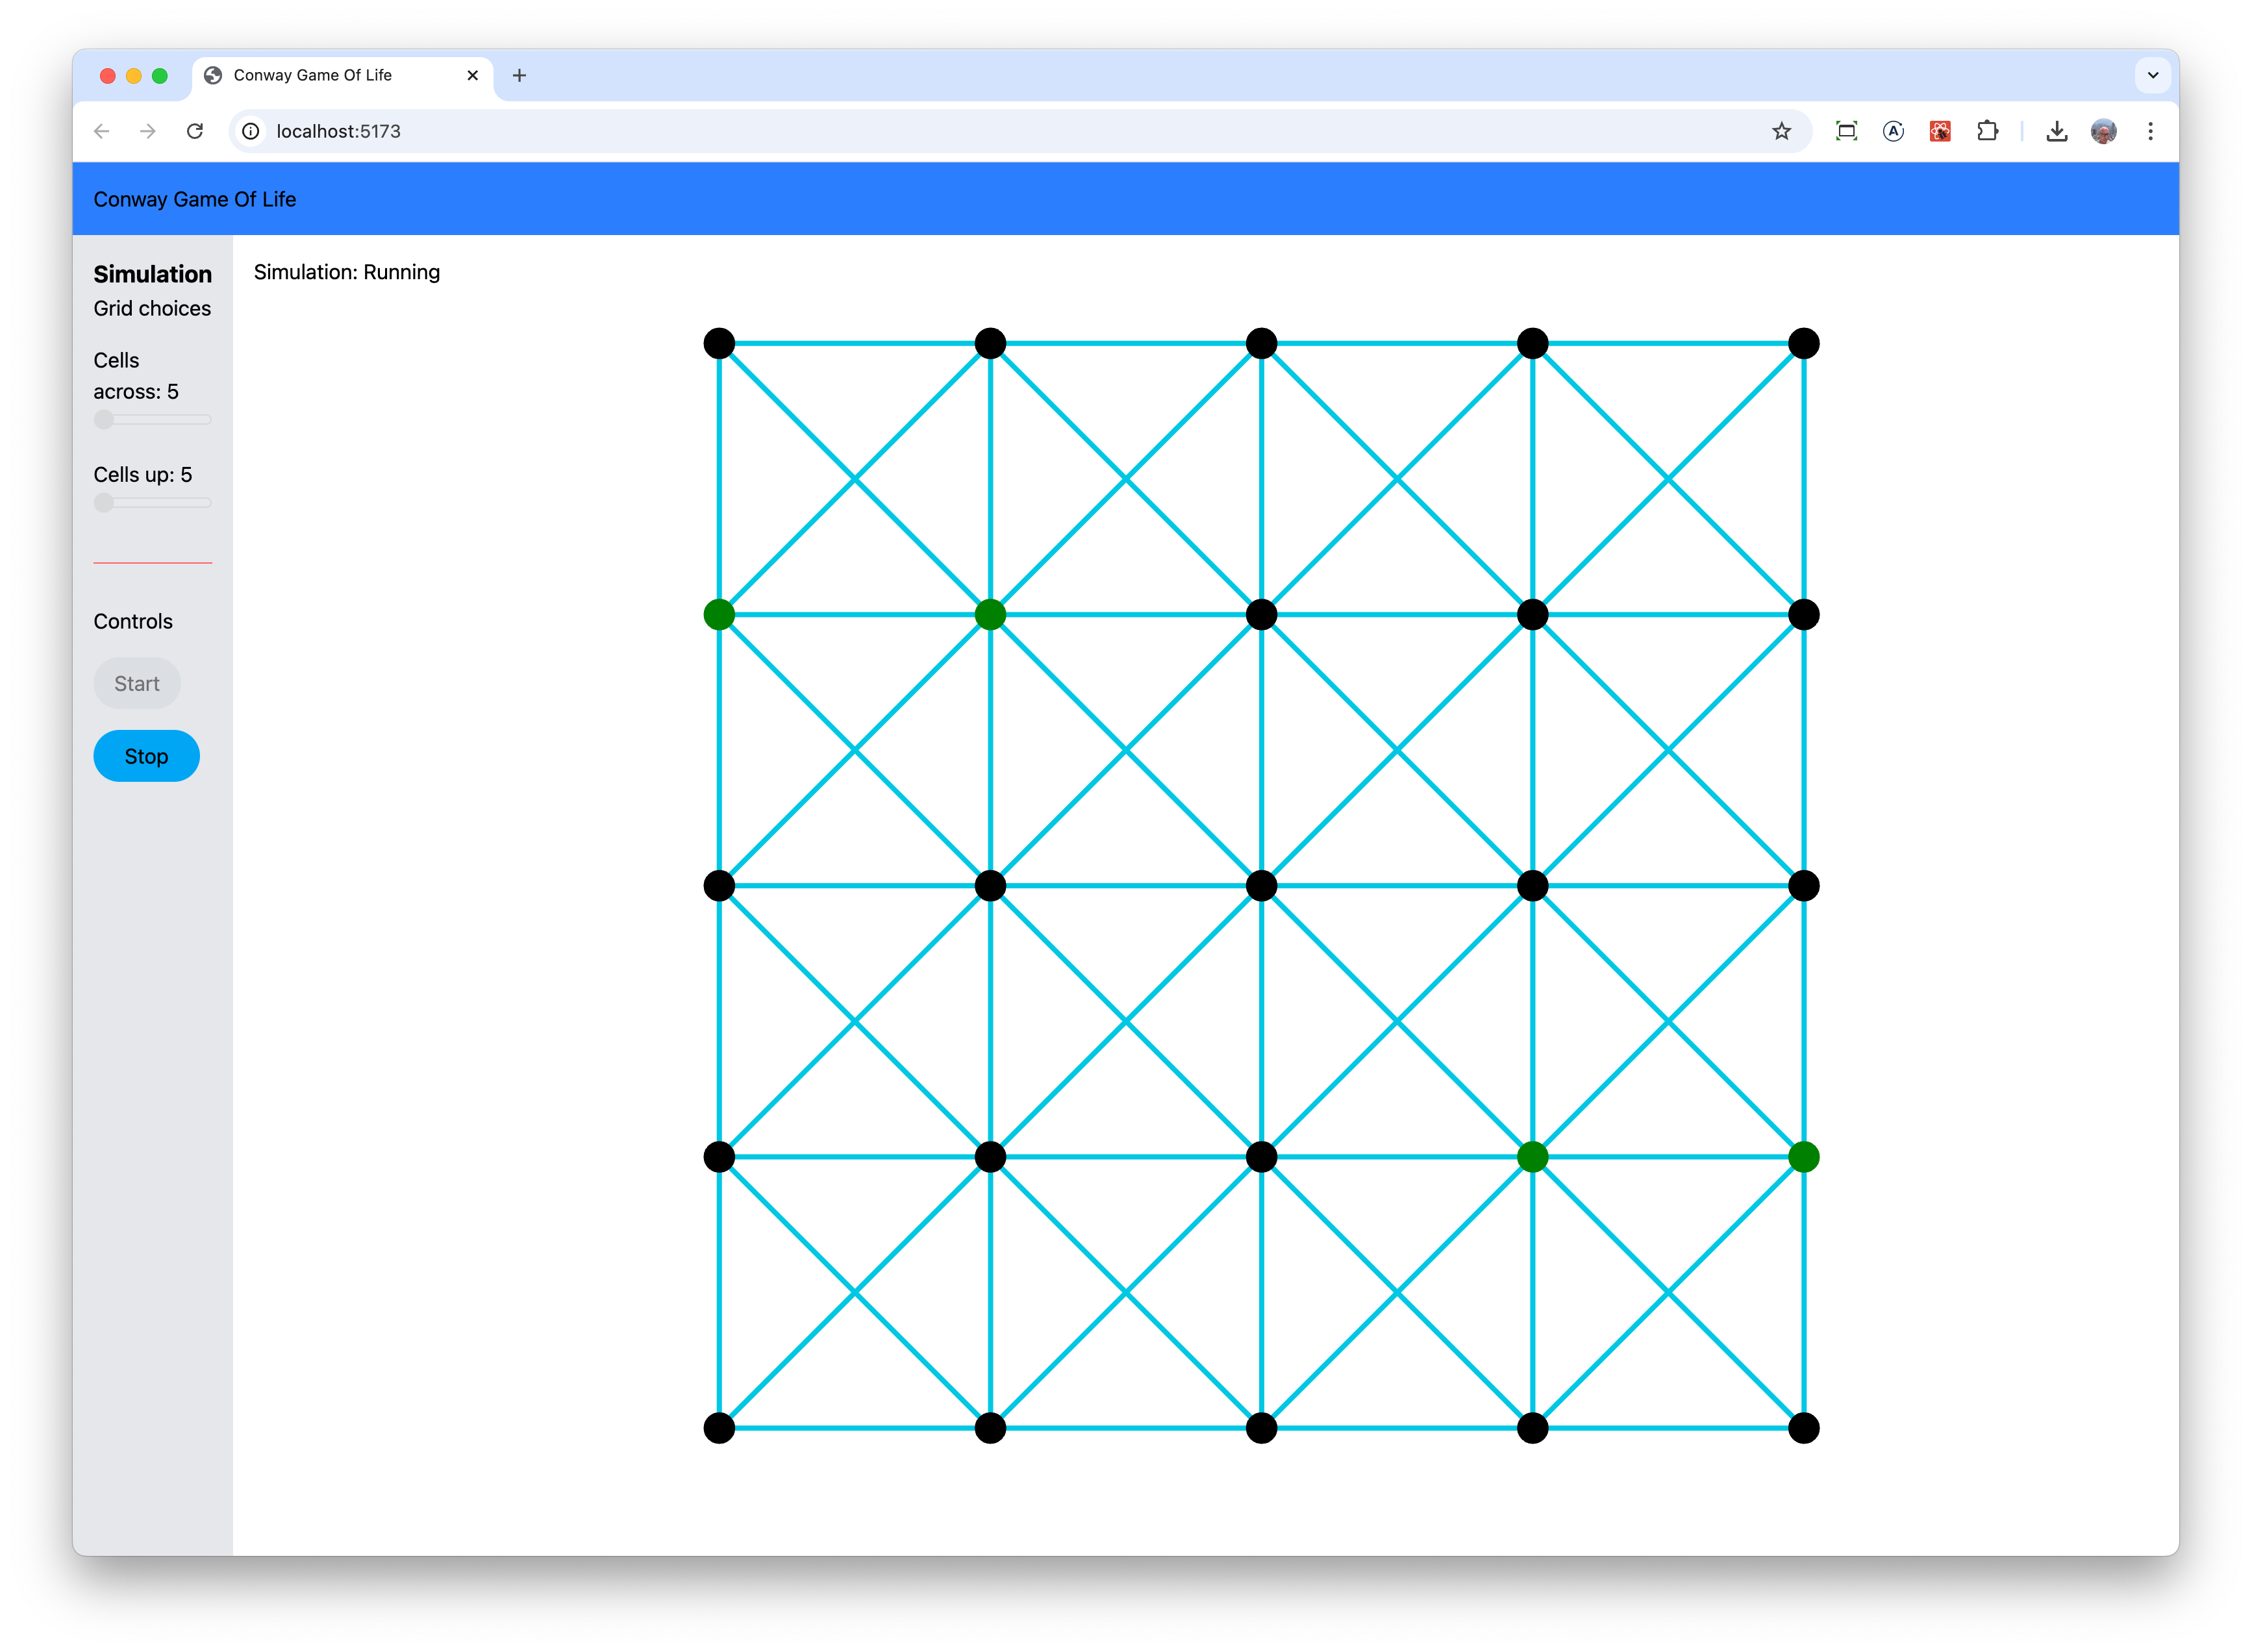
On initial page load, the user sees a pre-define grid where all of the cells are dead. They can change the size of the grid by using the sliders on the sidebar, toggle cells between alive / dead with a mouse click, and , once they are happy with everything, commence the simulation by selecting ‘start’. Whilst the simulation is running, the grid cannot be modified. The simulation will run until the user selects ‘stop’ which will allow changes to be performed again.
Neo4j is acting as a backend storage and being accessed using GraphQL. This comes into effect once the user has selected ‘start’ with any existing grid being removed and replaced by the one chosen by the user. From that point onwards each iteration of the simulation will
- read the entire grid from the database
- obtain a list of cells with any alive neighbours from the database
- With these details, apply the Conway Game of Life rules
- Take the results and writes them back to the database before updating the UI
This process continues until the user select ‘Stop’
The Approach
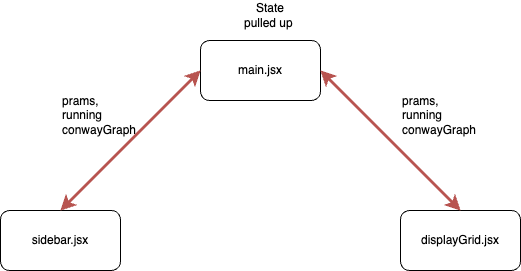
Armed with the aforementioned description and with reference to , what has been described as ‘expressive’ , my drawing of the UX, I commenced with exploring methods to achieve what was needed.
I started with the UX. With a lot of reference to documentation, blogs and other research into React, I took to having a main component that laid out the browser window with two sub-components that provided for the sidebar and displaying of the grid.
With hindsight and with the knowledge I have gained, I would look into using react context as state is drilled down a couple of levels.
I ended up with three components for the UX
- main.jsx my top level component that sets out the browser and holds state*
- sidebar.jsx: deals with user controls to resize the grid, start and stop the simulation.
- displayGrid.jsx: everything for displaying the grid using ForceGraph2D
As information would need to flow between sub-components, state was pulled up into main to allow for this . For example, when a user changes the size of the grid using slide controllers, that detail needs to get to the grid component from the sidebar component. Moving state into main provides that ability. After finishing this first version, I came across React Context which has possibilities here.
Running the simulation along with various GraphQL activity, is held within other files that I’ll come to in a bit. I did this to keep the aforementioned components focused on UX activity. Speaking of UX, I used TailWindCSS for all of the styling , controls etc.. Lots of documentation and examples made it an appealing choice.
To get started on the React project, I used Vite
npm create vite@latest conway-game-of-life
I choose to use JavaScript rather than TypeScript. My peers had strongly advised me to use TypeScript and I did try. But, wow, that’s a very steep learning curve. Once I understand JavaScript better I will move as TypeScript would have saved me a couple of times from type related mistakes. And it aligns nicely with GraphQL being strongly typed.
GraphQL
In many ways, this was the easiest bit with only one minor change from what I had written about in a previous post covering GraphQL needed for this project. To help with debugging, I have two mutations - one that changes cells to alive, and another to dead - rather than do this in one. Tracing what is going on in the browser development tools is easier when you have clear naming in the network requests being made.
Here are the GraphQL queries and mutations I used.
const deleteGrid =
    "mutation deleteEntireGrid { deleteCells { relationshipsDeleted nodesDeleted }}";

  const createGrid =
    "mutation createCells($input: [CellCreateInput!]!) { createCells(input: $input) { cells { id alive } }}";

  const joinCells = "mutation MyMutation { joinCellsTogetherIntoGrid }";

  const getCellWithAliveConnectedCells =
    "query aliveCellsWithAliveNeighours { cells { id alive x y connectedCells(where: { alive: { eq: true } }) { id } } }";

  const setCellToAlive =
    "mutation changeCellToAlive($where: CellWhere) { updateCells(where: $where, update: {alive: {set: true}} ) { cells { id alive } } }";

  const setCellToDead =
    "mutation changeCellToDead($where: CellWhere) { updateCells(where: $where, update: {alive: {set: false}} ) { cells { id alive } } }";

  const readCellsOnGrid = "query getEntireGrid { cells { alive id x y } }";
With this current version , there’s more information being returned in some cases than maybe necessary but that can be tweaked in the future.
There are a number of well known clients for GraphQL that are available for React, such as those from Apollo, Relay, urql and others. I didn’t use any of these as I had a lot of new stuff to learn and I was already familar with using fetch().
I placed this into it’s own function like so
export default function UseGraphQLAPI(query, variables) {
// Read our environment variables from the .env file in the root
// of this project.  This is done for us by Vite
  const GRAPHQL_URI = import.meta.env.VITE_GRAPHQL_URL;
  const GRAPHQL_URL_API_KEY = import.meta.env.VITE_GRAPHQL_URL_API_KEY;

  const fetchGraphQL = async (query, variables = {}) => {
    try {
      const response = await fetch(GRAPHQL_URI, {
        method: "POST",
        headers: {
          "Content-Type": "application/json",
          "x-api-key": GRAPHQL_URL_API_KEY,
        },
        body: JSON.stringify({ query, variables }),
      });
      const result = await response.json();
      if (result.errors) {
        console.error("GraphQL Errors:", result.errors);
        throw new Error("GraphQL Error");
      }
      return result.data;
    } catch (error) {
      console.error("Error in fetchGraphQL:", error);
      throw error;
    }
  };

  return fetchGraphQL(query, variables);
}
Vite reads .env file for us to obtain the values for where our GraphQL endpoint is and the authentication information needed to access it. Making error handling a bit more friendly is an area for more work as it just throws an error at the moment.
passing state around
In main.jsx we see
 const [params, setParams] = useState({
    cellsWidth: 5,
    cellsHeight: 5,
    cellSpacing: 50,
  });
  const [running, setRunning] = useState(false);
  const [conwayGraph, setConwayGraph] = useState(buildForceGraphGrid(params.cellsWidth, params.cellsHeight, params.cellSpacing));
These get used and mutated in various places within components / functions underneath main.jsx. This is why state has been pulled up from them to allow for this.
I did encounter a situation where the state change of running from false to true did not happen quickly enough resulting in the simulation never running. After some scratching of head, I asked ChatGPT and it pointed me in the direction of useRef and useEffect.
ChaptGPT has been really efficient at finding issues and explaining what to do about them - most of the time. The answers still need verifying but I found it to be an effective teacher when learning a new language and got me unblocked a couple of times
You can see this in startSim.jsx here
const runningRef = useRef(running);

useEffect(() => {
runningRef.current = running;
}, [running]);
This worked but I’m not 100% clear as to why and I’m still reading up on useRef vs useState.
ChatGPT also recommended using await new Promise((resolve) => setTimeout(resolve, 100)); to provide React with time to do other things - like update state - and avoid the appearance of hanging.
Forcegraph2d
My meanderings around the internet led me to ForceGraph2D for taking care of showing the grid. If you’re considering using this - and it’s a good choice - then here’s where I ended up at
<ForceGraph2D
        graphData={conwayGraph}
        ref={fgRef}
        linkColor={() => "#00c7e3"}
        linkWidth={4}
        nodeRelSize={8}
        enableNodeDrag={false} // Stops individual cells being moved around
        d3VelocityDecay={0} // Avoid this being a force layout
        cooldownTicks={0} // Using zero stops the grid jumping around
        nodeAutoColorBy={null}
        panInteraction={false} // Should stop panning but didn't
        d3AlphaMin={1}
        zoom={false}  // Should prevent zoom but didn't
        onEngineStop={() => fgRef.current?.zoomToFit(400)}
        onNodeClick={(node) => {
          ToggleCellState({ node });
        }}
        nodeCanvasObject={drawNode} // Node rendering function to override default
      />
You’ll notice from the comments that several settings didn’t do exactly what I expected. I never got to the bottom of this but are worthy of further exploration.
By pure chance, having cell x y properties helped with the rectangular layout.
As I wanted to be able to dynamically change colour when a user selected a node to toggle it between alive / dead , I used a custom rendering function along with another function that handles changing the grid when that event happens. In both cases, due to my lack of familairity with ForceGraph2D, I asked ChatGPT how to do this. The resulting code needed a bit of tweaking but what you see is what ChatGPT suggested.
Even with the yet to be solved issues around panning / zoom, I still recommend using ForceGraph2D with graphs. It was really quick to get going with. D3.js is one of the alternatives but seemed to have, for me anyway, a steeper learning curve.
Lots of possibilities with this library for another time.
main.jsx
Nothing amazing going on here. The inital grid displayed is handled by buildForceGraphGrid that returns an object in the format that ForceGraph2D requires.
sidebar.jsx
Provides the left hand nav bar using various CSS from TailWindCSS.
The sliders that control grid height and width are enabled / disabled based on the value of running. This is achieved by use of disabled={running} property and a change of appearance using CSS
className={
    !running
    ? "w-full"
    : "bg-gray-300 cursor-not-allowed opacity-50 w-full"
}
This technique is used where a control should be disabled when the simulation is running and enabled when it is not.
The ‘start’ and ‘stop’ buttons do what they suggest. When ‘start’ is selected, the startSim component is called.
startSim
Here we control the simulation with useState being called to trigger re-render of the grid to show what’s happening on each iteration.
A try / await block ensures that things happen in the order they need to e.g delete the currently stored grid and then create a new one.
A while loop is used to continous iterate until running becomes false. This carries the risk of making the UX un-responsive which is why there are several await new Promise((resolve) => setTimeout(resolve, 100)); statements at various points to mitigate this eventuality and allow React to do it’s own work.
It was within this bit of the code that I stumbled across the way Javascript passes arguments to a function. You may notice
var nextGraphIteration = simulation(
            structuredClone(cellsAliveNeightbours),
            structuredClone(cellsWithStatus),
            structuredClone(conwayGraph.links)
          );
where structuredClone is being used to take a copy of objects as I had discovered the hard way that Javascript passes objects by reference and not by value. I don’t think they are needed anymore as I made changes in nextGraphIteration but that’s for another day.
Conway Game Of Life rules are processed in simulation.js rather than here. This was to try and keep startSim readable and made sense to move a discreate bit of functionality into it’s own file.
simulation.js
It’s entirely possible to process each iteration in the GraphQL Type Definitions using @CYPHER directive and some Cypher so that Neo4j DB does all of the hard work and avoids looping around cells like is done here. For now that seems a bit like cheating.
nextGraphIteration takes in objects that have
- An array of cells, each with it’s immediate alive neighbours from a GraphQL query
- The existing Grid from a GraphQL query
- The existing links between cells from conwayGraph
It then returns
- the new grid to be displayed using ForceGraph2D
- An array that has the cells to change to alive
- An array that has the cells to change to dead
By looping around the list of cells and it’s alive neighbours, we check to see if alive neighbour count will cause each cell to become alive, dead or stay as it is.
if (existingCell.alive) {
      switch (cellAliveNeighbourCount) {
        case 0:
          existingCell.alive = false;
          request_where_dead.id.in.push(existingCell.id);
          break;
        case 1:
          existingCell.alive = false;
          request_where_dead.id.in.push(existingCell.id);
          break;
        case 2:
          existingCell.alive = true;
          request_where_alive.id.in.push(existingCell.id);
          break;
        case 3:
          existingCell.alive = true;
          request_where_alive.id.in.push(existingCell.id);
          break;
        default:
          existingCell.alive = false;
          request_where_dead.id.in.push(existingCell.id);
      }
    } else if (!existingCell.alive) {
      // cell is currently dead.  Can it become alive?
      switch (cellAliveNeighbourCount) {
        case 3:
          existingCell.alive = true;
          request_where_alive.id.in.push(existingCell.id);
          break;
      }
The equivalent Cypher looks like this
MATCH (cell:Cell)
OPTIONAL MATCH (cell)-[:NEIGHBOUR_OF]-(:Cell {state: "alive" })
WITH cell, COUNT(*) AS liveNeighbours
SET cell.state =
CASE liveNeighbours
 WHEN <= 1 THEN "dead"
 WHEN >= 4 THEN "dead"
 WHEN = 3 THEN "alive"
 ELSE cell.state
END
I’ll let you decide between the two.
Back in startSim, the database gets updated using the mtwo mutations and then conwayGraph gets changed, all using the return from nextGraphIteration
The process continues until running gets changed to false.
displayGrid.jsx
displayGird.jsx is ( mostly ) focused on showing the grid using ForceGraph2D, something I have already commented on.
I’d like to see if I can move the code for re-sizing to sidebar so displayGrid.jsx just does what it says. But that’s for another day.
  // If the slides are used to re-size the grid, this will detect it
  // and re-draw our newly sized grid
  useEffect(() => {
    if (running) return; // don't do this if sim is running
    const newSizeGraph = resizeGrid(
      params.cellsWidth,
      params.cellsHeight,
      params.cellSpacing,
      conwayGraph
    );
    setConwayGraph(newSizeGraph);
  }, [params.cellsHeight, params.cellsWidth, params.cellSpacing]);
resizeGrid takes the current grid, conwayGraph, with new height, width and spacing and returns a new version using those settings. The code for this was supplied by ChatGPT - I was in a bit of hurry at this point and short of time. It worked with only minor tweaks. Kinda of impressed with ChatGPT.
Wrapping this up
My code worked, I got a lot out of this exercise and I have even more respect for folks that are involved with frontend development.
For my fellow PMs, go try your hand at coding - any coding. Start with something straight forward and feel free to stop after your first ‘Hello World’. But if you do pursue it, and no one is going to expect you to start submitting product ready Pull Requests, you’ll gain deeper understanding and empathy with your engineering peers and with your customers. It’s another step towards becoming a well rounded PM.
Enjoy
GitHub repo for Conway Game of Life