A Guide To The New Aura CLI
The new Neo4j Aura CLI is a powerful new tool designed to simplify and streamline the management of your Neo4j Aura resources directly from the command line. Whether you’re provisioning new databases or scaling existing ones, the Neo4j Aura CLI empowers developers and operations teams with greater flexibility, speed, and efficiency. Built with ease of use in mind, this CLI bridges the gap between automation and hands-on control, enabling you to integrate Neo4j Aura seamlessly into your workflows. Let’s explore how to install and use this essential addition to your Neo4j toolkit.
Installation
The new Aura CLI is available on GitHub. Choose the latest release and download the archive suitable for your platform and architecture of choice. The CLI is fully compatible with Mac, Linux and Windows.
-
Using your browser, navigate to https://github.com/neo4j/aura-cli/releases
-
Download the compressed file that matches your computer. Make a note of the folder where the file is located.
-
After the file has been downloaded, extract the contents.
-
Open a command prompt and move to the location where you extracted the files.
-
Complete the installation by moving the aura-cli executable file into the file path.
- Mac users:
sudo mv aura-cli /usr/local/bin
- Windows users:
move aura-cli c:\windows\system32
Check installation with
aura-cli -v
You should see aura version v1.0.0
Note: If you are using a Mac, you may receive a rather alarming warning from Apple that aura-cli could not be verified. If this happens, then open system settings, select Privacy & Security on the left, and scroll down on the right. Select Open Anyway. This should not happen again. The aura-cli has been through the Apple certification process but this can take time to trickle down through the Apple ecosystem.
Initial configuration
Obtain an Aura API Key
Note: You need to have some form of payment information in your account to access this functionality. This also applies to Aura Free
Aura console classic
-
Login into the Neo4j Aura Console
-
Navigate to the top right where your account name is displayed as shown in the red box below and click on the down arrow
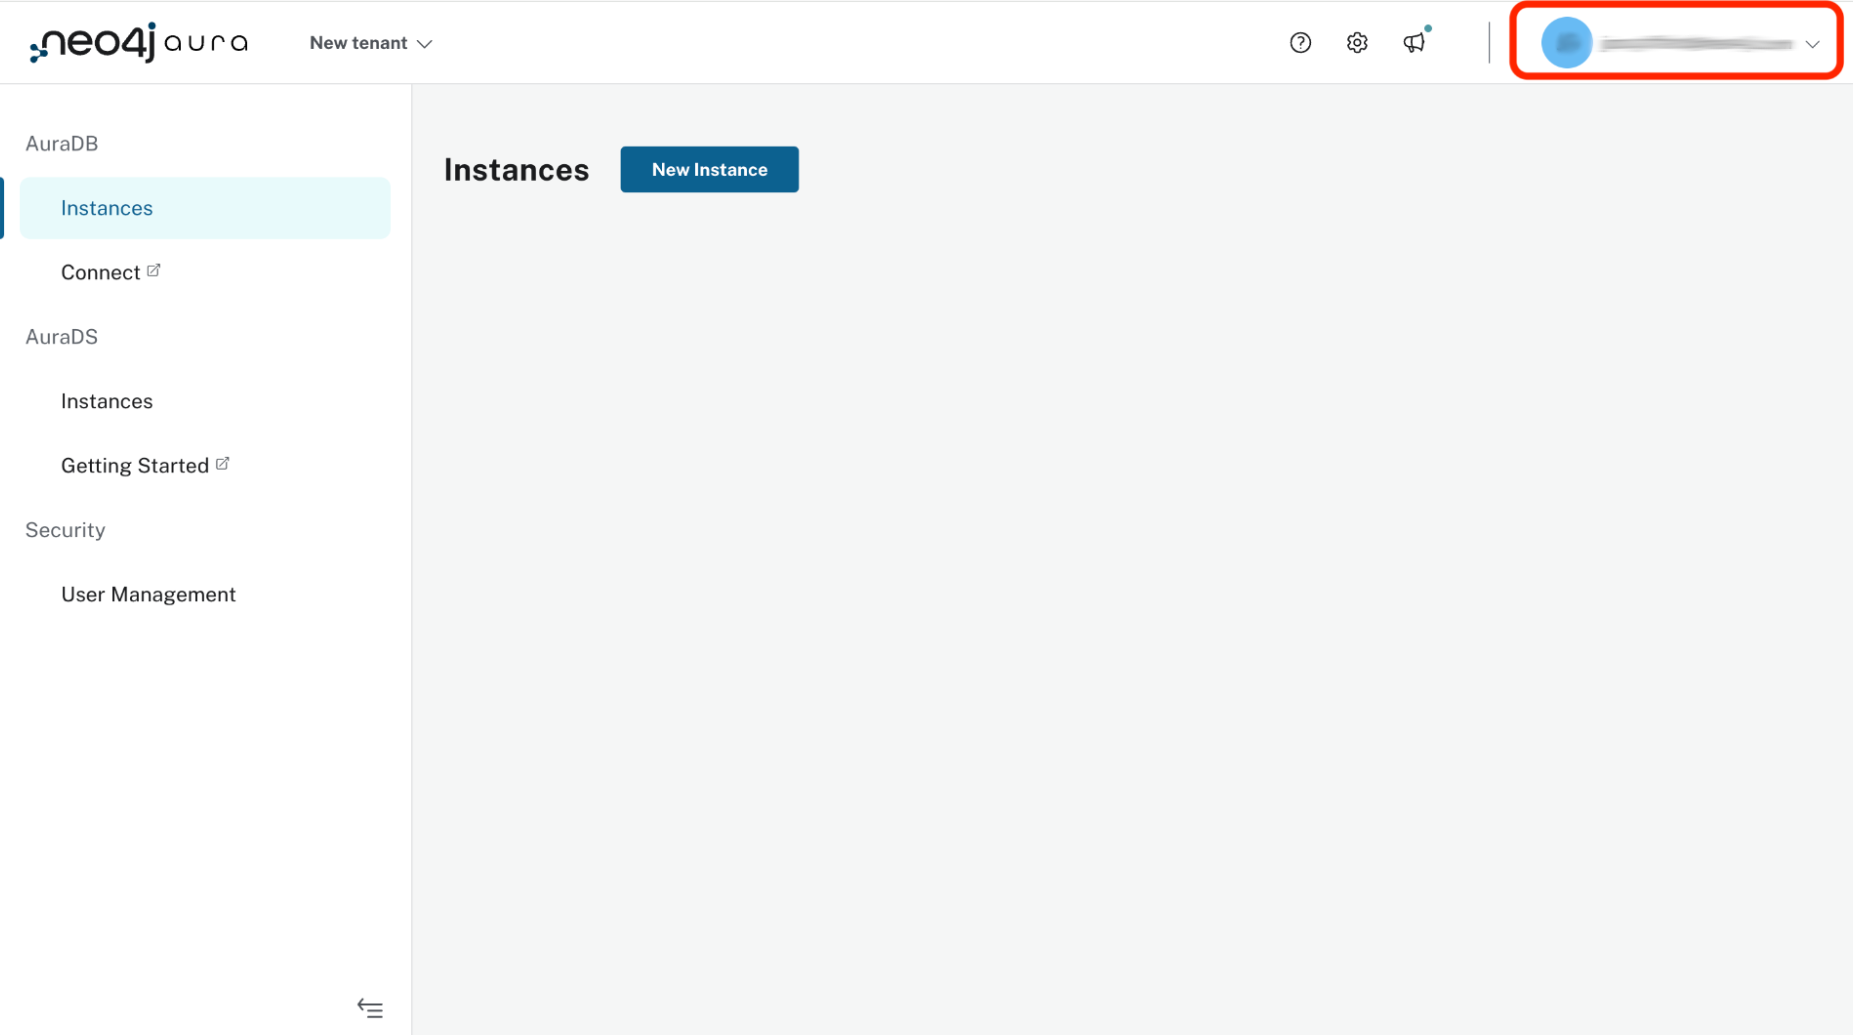
-
You will be shown a menu with your account name. Select Account Details
-
From the Account Details display, select the Create button in the Aura API Credentials section.
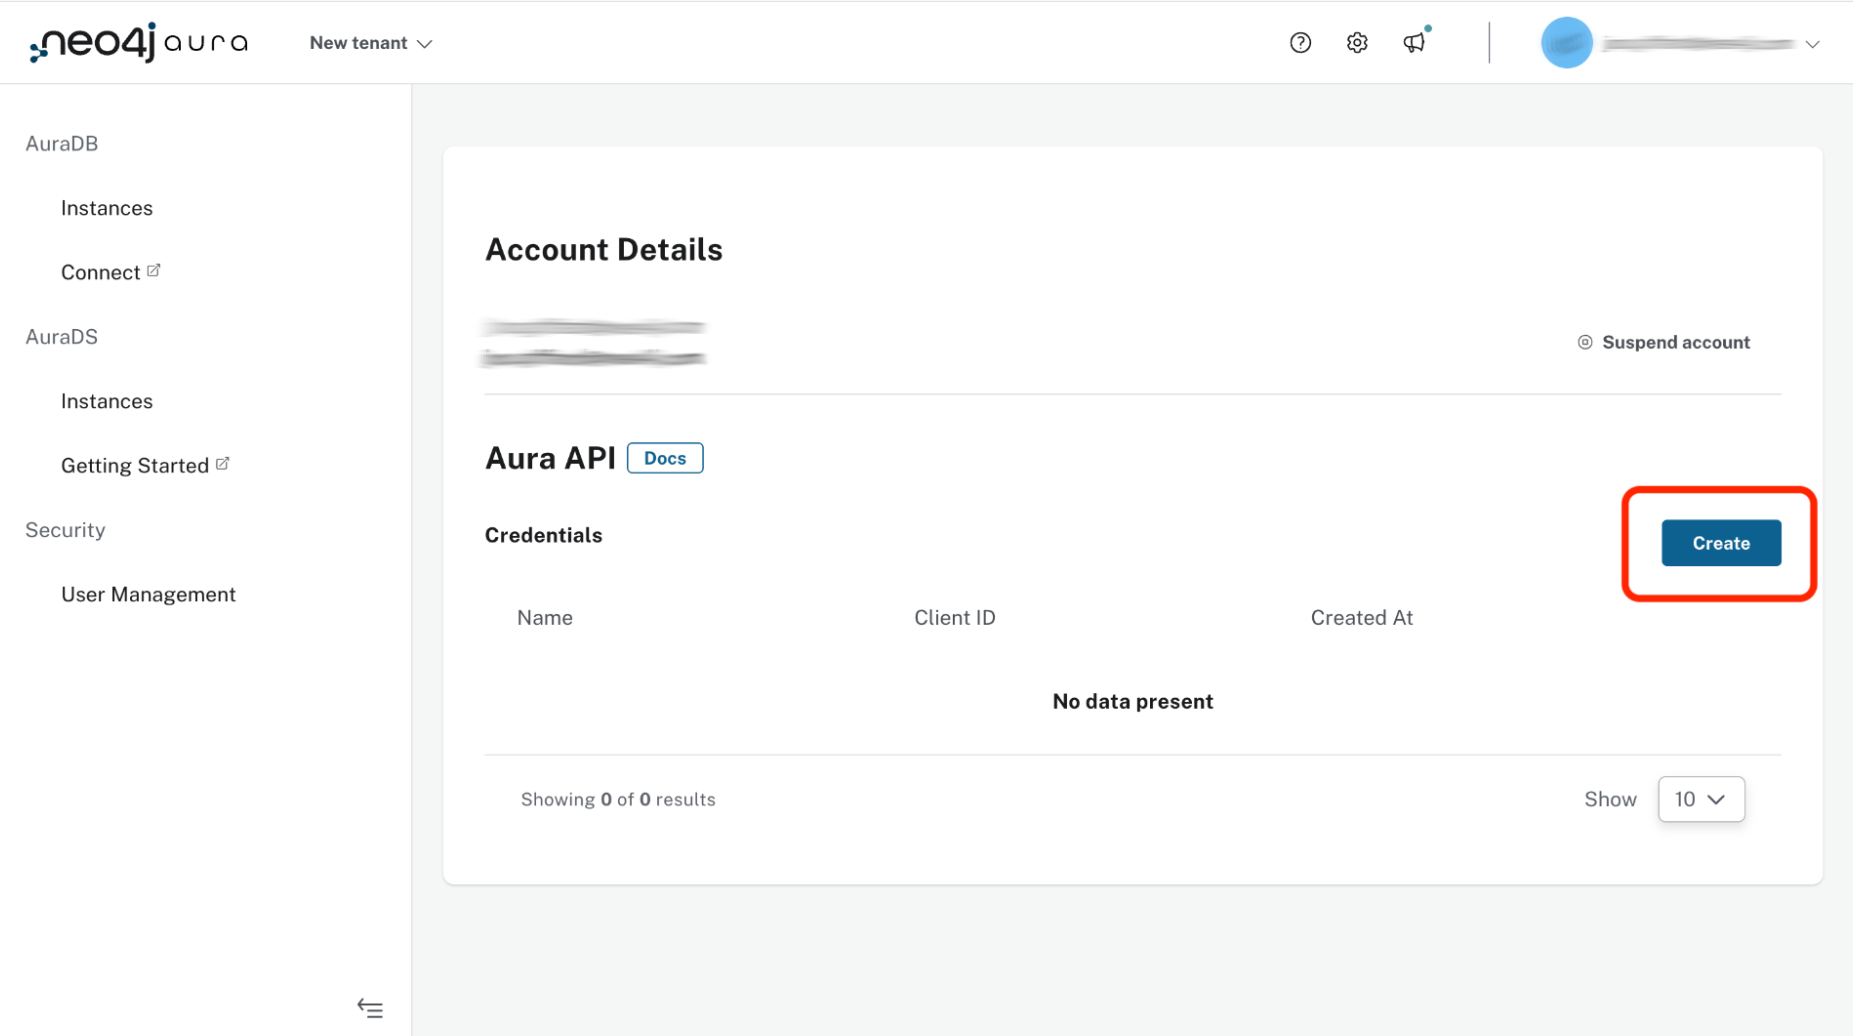
-
On the pop-up window, enter a Client name, and select Create.
-
You will be shown the newly created Client ID and Client Secret. Make sure to securely save these as they are required to use the Aura CLI.
New Unified Aura Console Experience
-
Login into the Neo4j Aura Console
-
Navigate to the top right where your account name is displayed as shown in the red box below and click on the down arrow
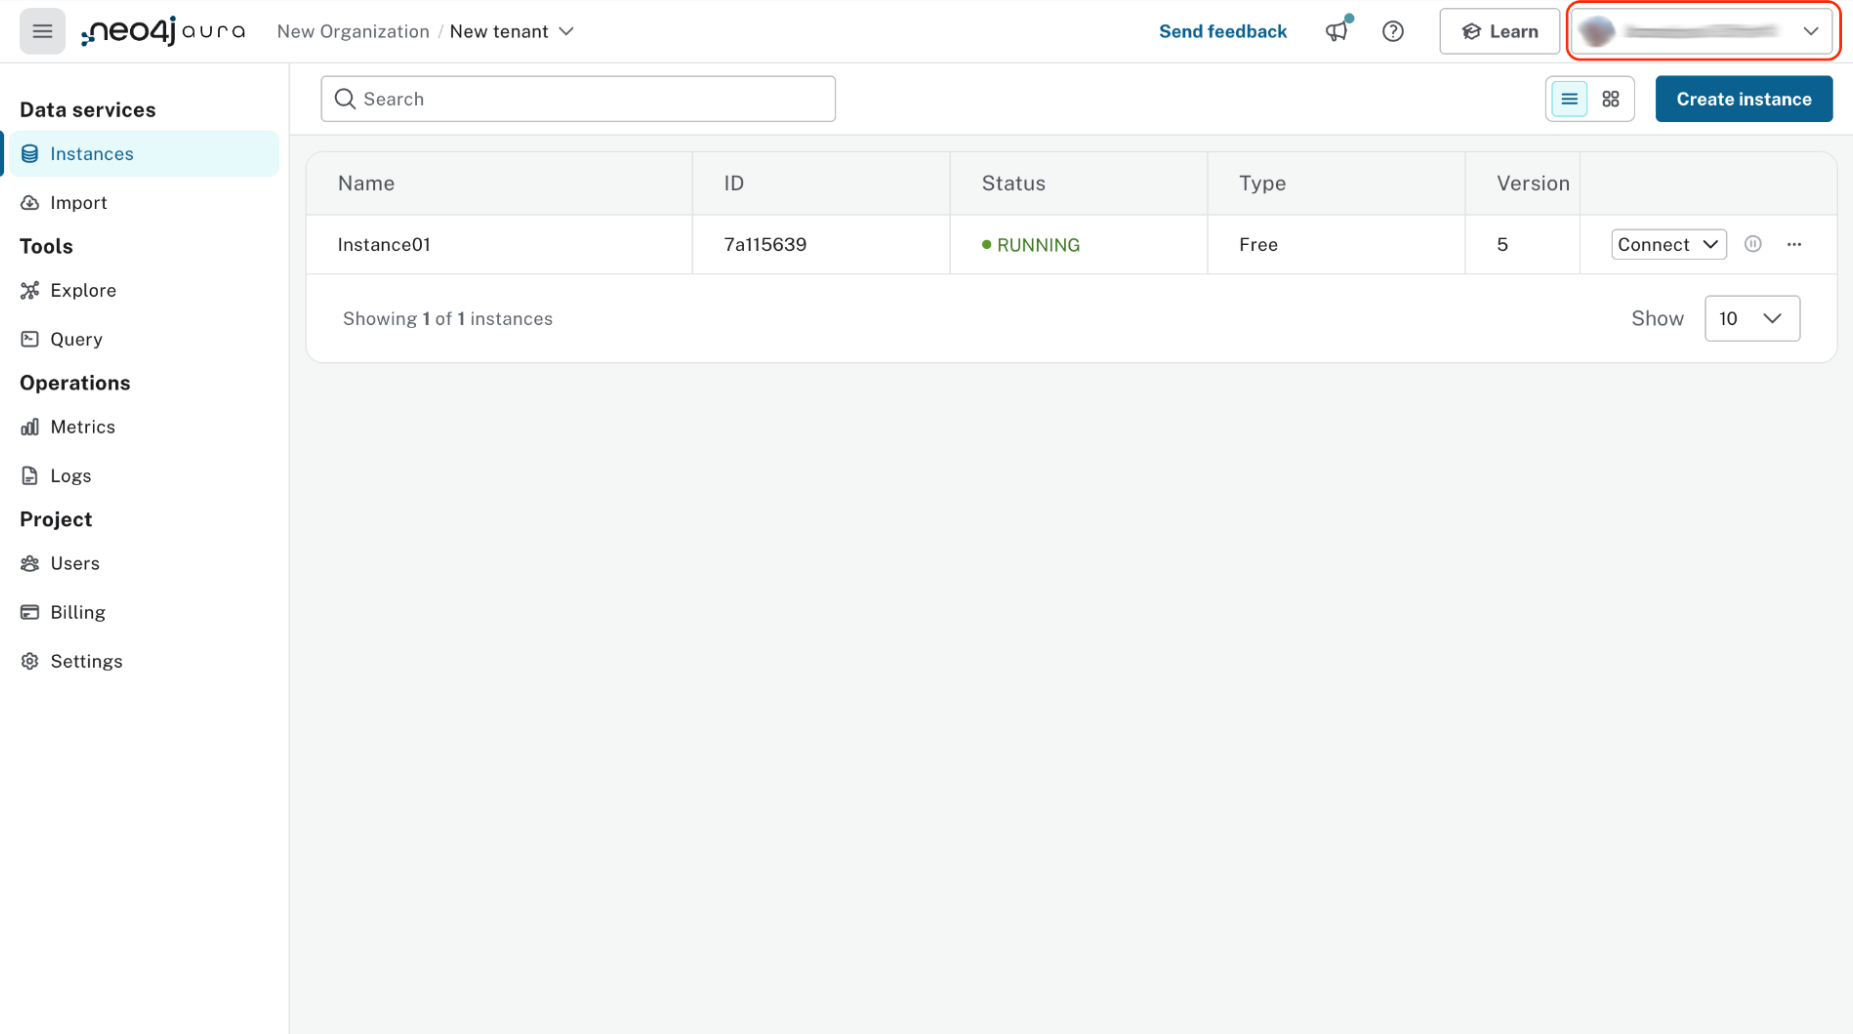
-
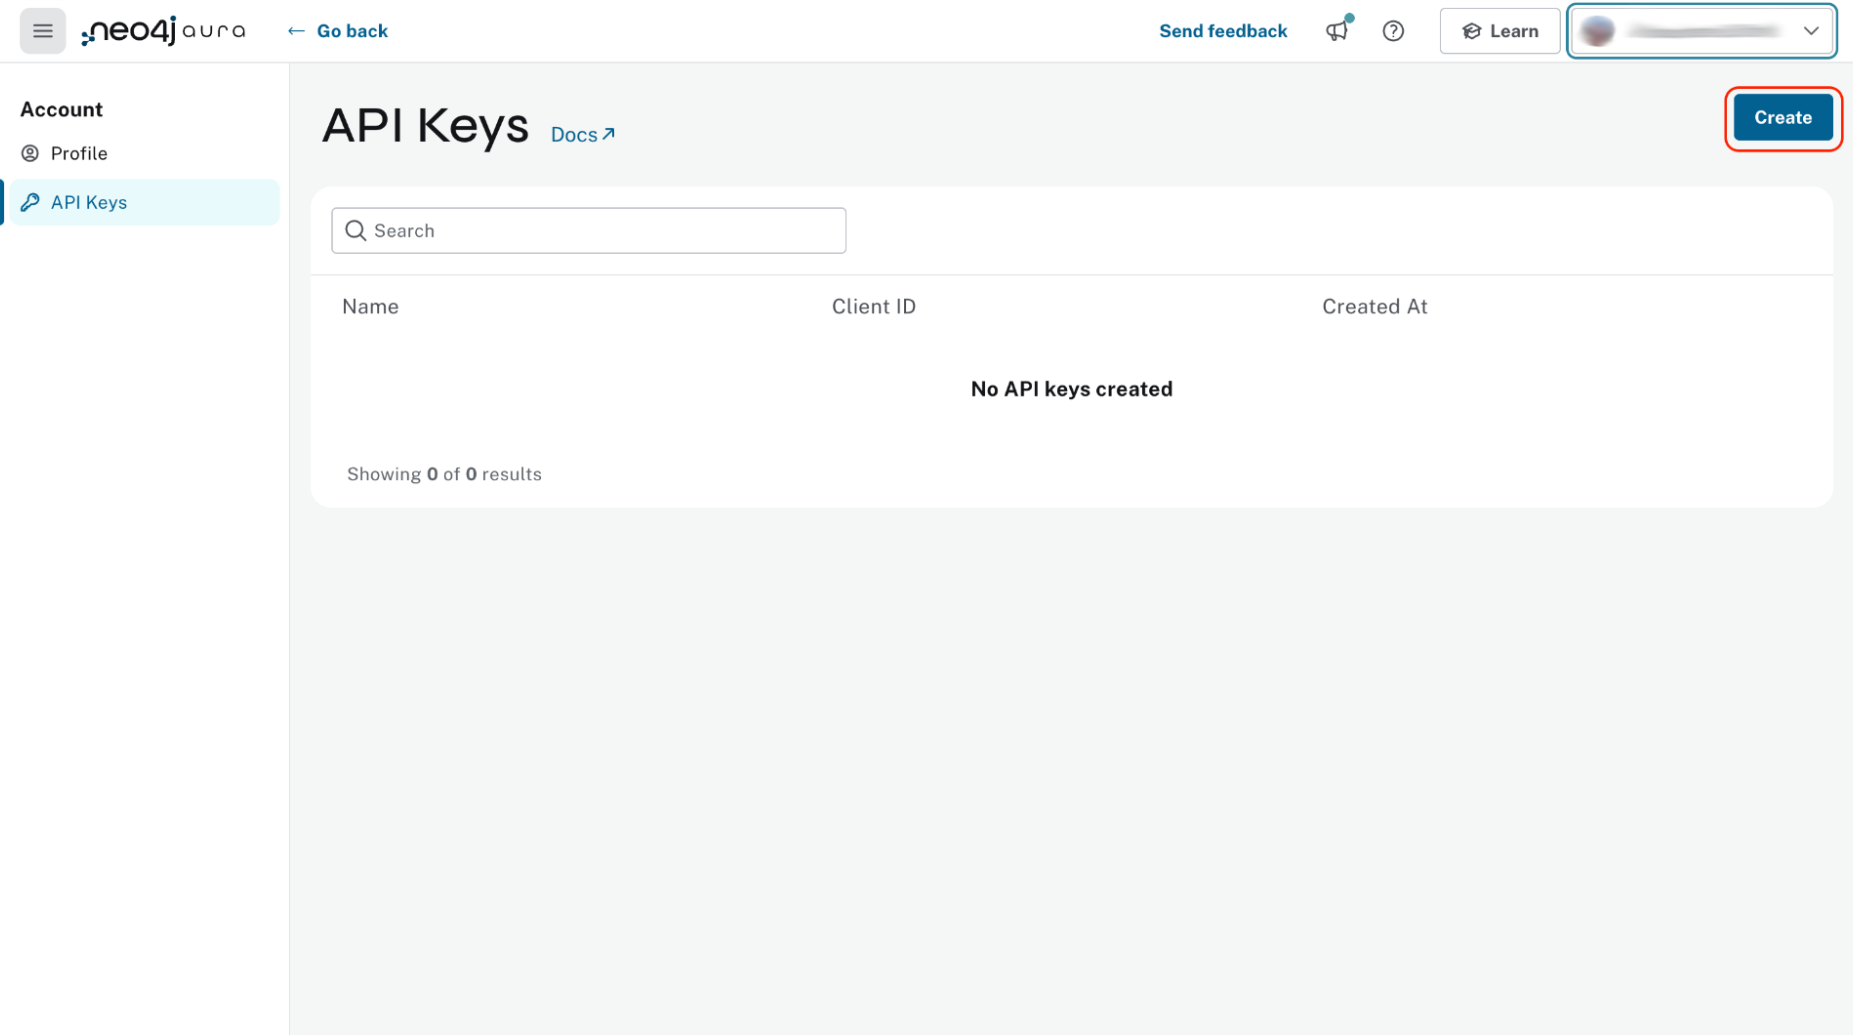
From the menu, choose _API keys__
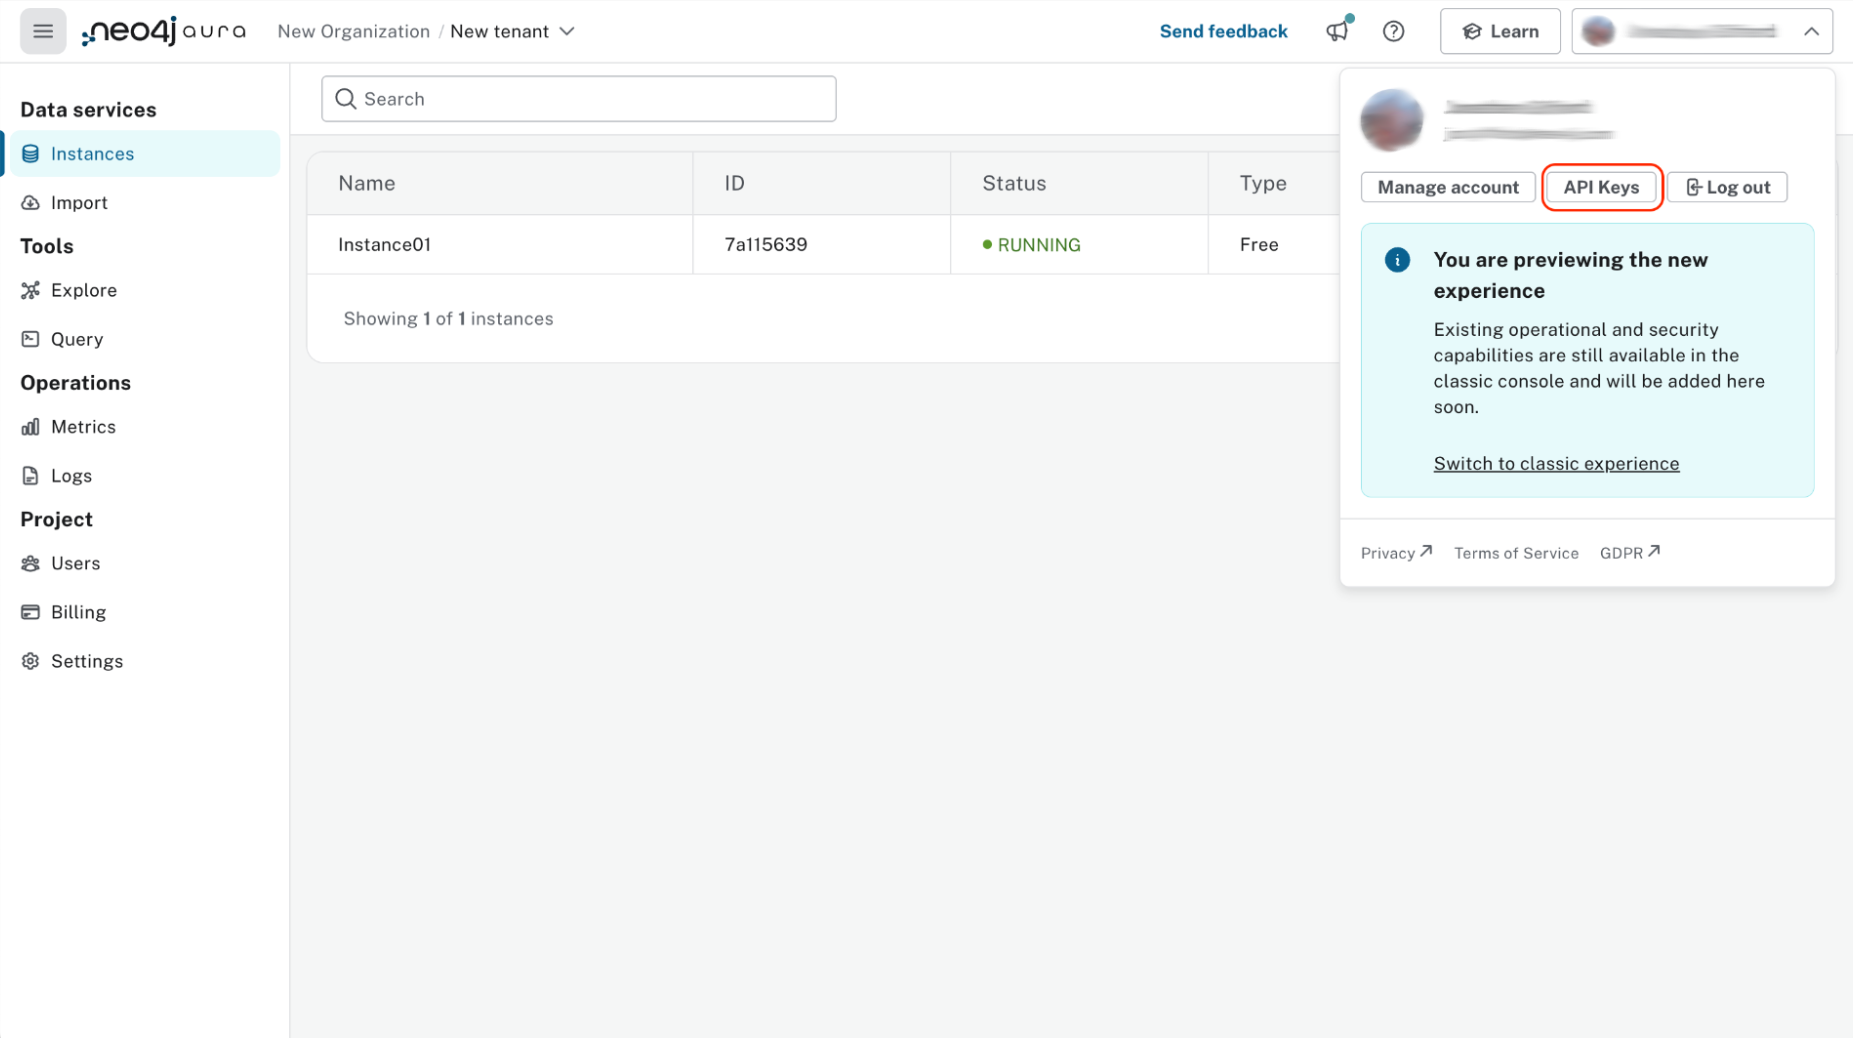
-
When API Keeys is shown, select Create
-
On the pop-up window, enter a name for the API Key and then select Create
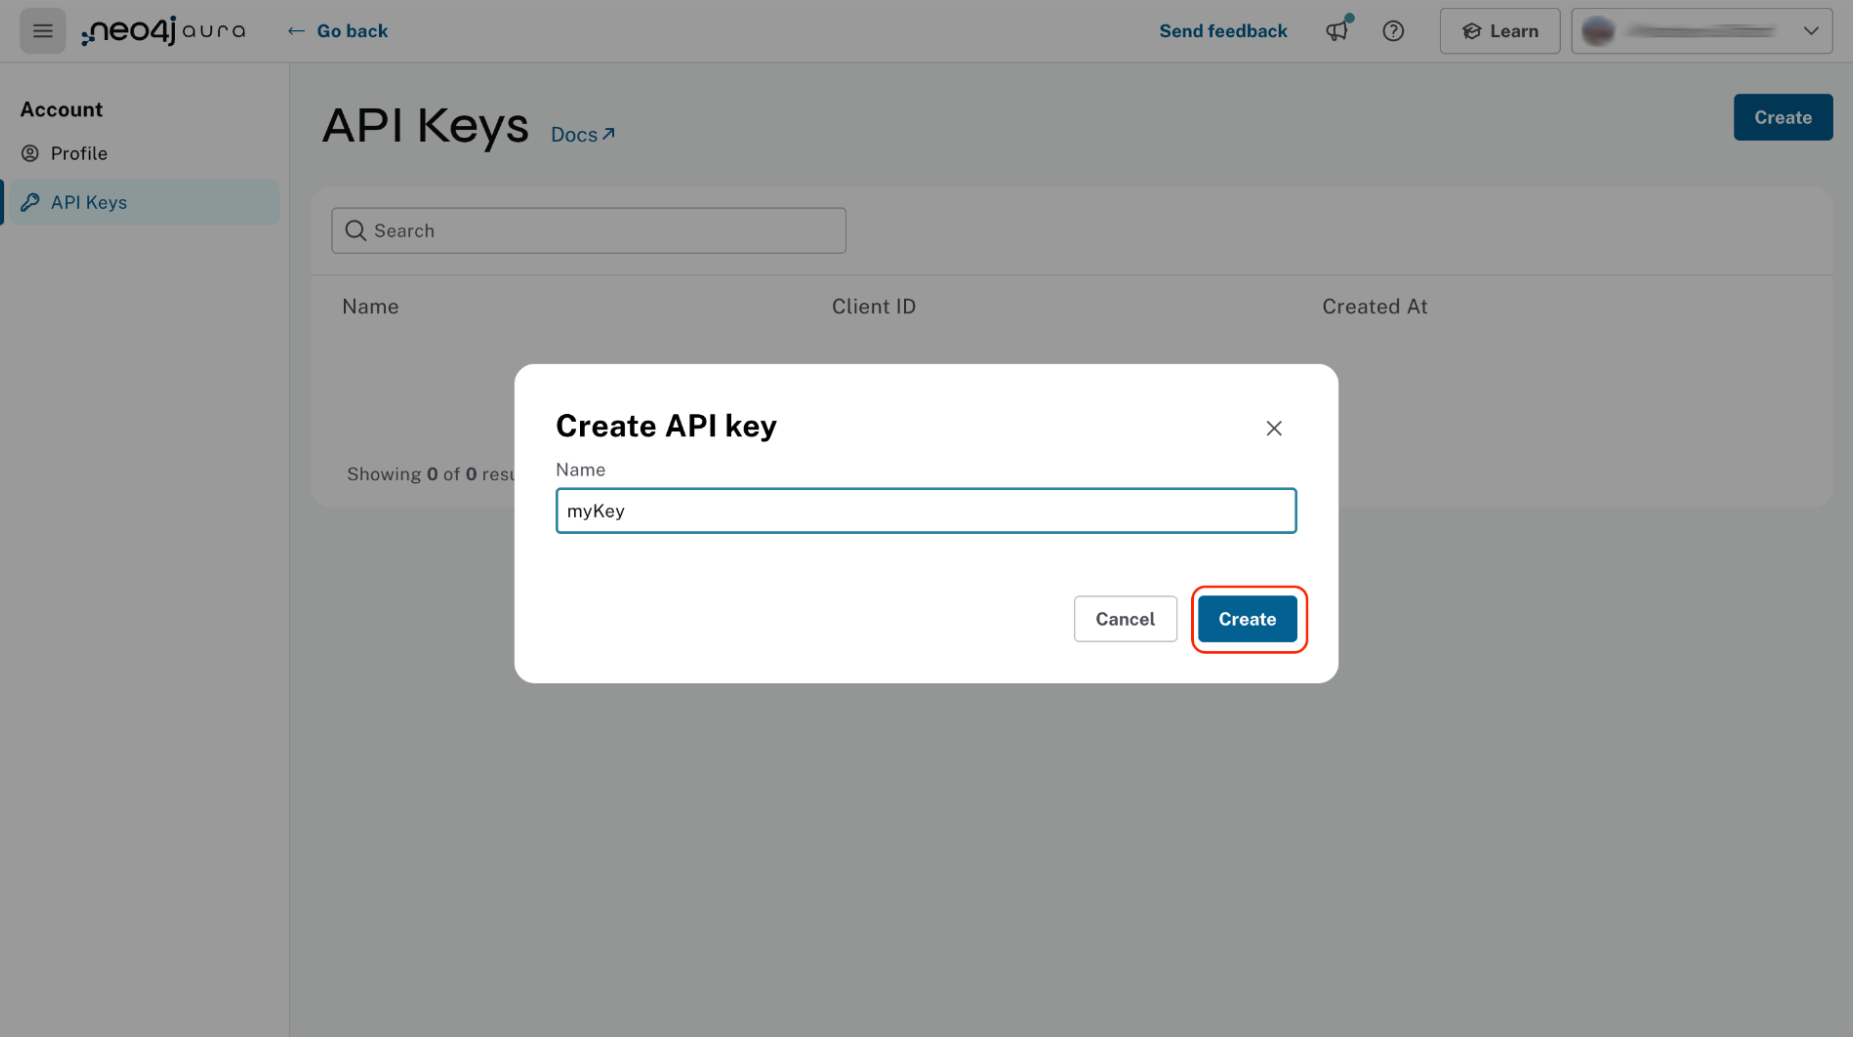
-
You will be shown the client id and client secret. Make a note as the client secret will not be shown again and you need both. If you download them, keep them safe.
Configure Aura CLI with Aura API key
Configure the Aura CLI with the Aura API client ID and client secret you obtained earlier. The Aura CLI refers to these as credentials and it is possible to have several sets of credentials and then choose which one to use.
-
At the command prompt, enter the following, using your values for the items in CAPITALS:
aura-cli credential add --name YOUR\_LABEL --client-id YOUR\_CLIENT\_ID --client-secret YOUR\_CLIENT\_SECRET -
To confirm the credentials are working, list your Aura instances.
aura-cli instance list --output table
Working with AuraDB tenants
Aura CLI allows you to list the Aura Tenants you can access and then obtain the available AuraDB instance for each one. To list tenants
aura-cli tenant list
To get available AuraDB instances for an individual tenant, change TENANT-ID to the one you are interested in. The output is substantial as all available AuraDB instance configurations are returned. Consider filtering, for example with the use of the jq utility
aura-cli tenant get TENANT-ID
If you have a single tenant or one that you use most frequently, it is recommended that you set it as the default to avoid repetition with other Aura CLI commands. Do this with
aura-cli config set default-tenant TENANT-ID
Managing AuraDB instances
The Aura CLI provides a full set of commands to manage the lifecycle of an AuraDB instance.
Create
Before you can create an AuraDB instance, you need to make sure that your desired configuration is available in a tenant where the AuraDB will reside. Get these by using the Tenant command as mentioned previouslyIf you are using Aura Free, there is no need to do this as the configurations are fixed. You can simply create an AuraDB instance with
aura-cli instance create --name YOUR\_INSTANCE\_NAME --type free-db --await
For other Aura Tiers, you must provide:-
- Instance name
- Memory
- Cloud provider
- Cloud Region
- Type
The values for these are found with the usage of the aforementioned Tenant commands. Once you have them, proceed with ( you can skip –tenant-id if you have set a default tenant)
aura-cli instance create --name YOUR_INSTANCE_NAME --cloud-provider YOUR_CLOUD_PROVIDER --region CLOUD_REGION --memory MEMORY --type AURA_INSTANCE_TYPE --tenant-id YOUR_TENANT_ID
The response will provide the connection details for the request AuraDB which will contain authentication details - the username and password - that are only shown once. Make sure to record these safely and securely.
List
Viewing AuraDB instances is achieved by using
aura-cli instance list
Use of the table format output option provides an improved viewing experience
aura-cli instance list --output table
From the list, you can then use the ID for an AuraDB instance to get detailed information about it, including the URL to use for metrics
aura-cli instance get YOUR_INSTANCE_ID
Update
A deployed AuraDB instance can have its name, memory or both changed.
aura-cli instance update YOUR_INSTANCE_ID --name NEW_NAME --memory NEW_MEMORY
You may omit –name, –memory as needed but at least one must be given
Delete
There’s no confirmation required when using the aura-cli for deletion and the operation starts immediately. Use with caution
aura-cli instance delete YOUR_INSTANCE_ID
Pause / Resume
A paused AuraDB instance incurs a lower cost per hour than when it is running. AuraDB instances when not in use and then Resuming when needed is an effective mechanism for cost control.
Pause
aura-cli instance pause YOUR_INSTANCE_ID
Resume
aura-cli instance resume YOUR_INSTANCE_ID
Snapshots
A snapshot is a copy of an AuraDB instances data at a specific point in time. It can then be restored with the ‘overwrite’ command of the Aura CLI.
Create
An instance must be running for a snapshot to be created
aura-cli instance snapshot create --instance-id YOUR_INSTANCE_ID
List
All of the snapshots for an AuraDB instance are returned in the response.
aura-cli instance snapshot list --instance-id YOUR_INSTANCE_ID
Get
To obtain the details for a single snapshot, use the Get command.
aura-cli instance snapshot SNAPSHOT_ID --instance-id YOUR_INSTANCE_ID
Overwrite
This provides the ability to over write the content of one AuraDB instance with that from another whilst leaving the configuration alone. However, the destination storage must be of sufficient size. A snapshot provides the source material. Overwrites can be used for restoration of an AuraDB instance databases, for duplication, moving between regions or any situation where you want to use the content of one AuraDB with another AuraDB. A couple of cautions* Existing content of the destination AuraDB instance is completely replaced
-
Like the Delete command of the Aura CLI, there is no confirmationProceed with caution. There are two sets of steps provided to illustrate the process of overwriting an existing AuraDB with the snapshot from another. * Historical snapshot is for choosing an existing, pior, snaphost.
-
Latest snapshot for when you want to take and use a new snapshotIn both cases, the destination AuraDB instance must be running. If Lastest Snapshot steps are used, then the source AuraDB must also be running.
Steps for Historical snapshot
-
Obtain the ID of the AuraDB instance that has the desired snapshot you wish to use ( referred to as the Source Instance ).
aura-cli instance list --output table -
Decide which of it’s snapshots to use and note the snapshot ID ( referred to as Source Snapshot )
aura-cli instance snapshot list --instance-id SOURCE_INSTANCE_ID -
Locate the destination AuraDB instance and obtain it’s ID ( referred to as the Destination Instance ).
aura-cli instance list --output table -
Perform the overwrite
aura-cli instance overwrite DESTINATION_INSTANCE_ID --source-instance-id SOURCE_INSTANCE_ID --source-snapshot-id SOURCE_SNAPSHOT_ID
If you receive a response that looks like
Error: [Source snapshot SOURCE_SNAPSHOT_ID is not exportable ]
You will need to select another snapshot to use. It is not possible at this time for the Aura CLI to indicate which snapshots are exportable.
-
The destination AuraDB instance content will now be overwritten. Depending on the size, this will take several minutes to complete. You can check the status with
aura-cli instance get DESTINATION_INSTANCE_ID
When the status is “Running” the overwrite is completed.
Steps for Latest snapshot
-
Locate the destination AuraDB instance and obtain it’s ID ( referred to as the Destination Instance ).
aura-cli instance list --output table -
Perform the overwrite
aura-cli instance overwrite DESTINATION_INSTANCE_ID --source-instance-id SOURCE_INSTANCE_ID -
The destination AuraDB instance content will now be overwritten. Depending on the size, this will take several minutes to complete. You can check the status with
aura-cli instance get DESTINATION_INSTANCE_ID
When the status is “Running” the overwrite is completed.
Customer Managed Keys
Encryption of data at rest is a standard feature of AuraDB and uses keys from a supported cloud key management service (KMS). AuraDB Virtual Dedicated Cloud customers may wish to use their own encryption keys, a capability that is referred to as Customer Managed Encryption Keys (CMEK). More information is available in Aura Documentation in the Encryption section and you are advised to read this before continuing. The Aura CLI allows management of this feature with these commands: CreateAllows Aura to use the Key defined in your Cloud Key Management System DeleteRemoves the permission for Aura to use a Key. This makes all data encrypted with that key inaccessible.List List already defined CMEKs GetDetailed information about an individual CMEK
Create
Before being able to use this command, you must have created your custom managed key in your cloud provides Key Management System ( KMS ) and configured its permissions correctly. This is explained in the Neo4j AuraDB documentation in the Encryption section.
aura-cli customer-managed-key create --tenant-id YOUR_TENANT_ID --type AURADB_TYPE --region CLOUD_REGION_OF_THE_AURADB_INSTANCE --name YOUR_CUSTOM_KEY_NAME --key-id YOUR_CUSTOM_KEY_ARN --cloud-provider YOUR_CLOUD_PROVIDE_THAT_HAS_THE_CUSTOM_KEY
Delete
This command executes immediately resulting in lost of data access by any AuraDB who is using the CMEK. Use with caution
aura-cli customer-managed-key delete YOUR\_AURA\_CMEK\_ID
List
Lists all configured CMEKs
aura-cli customer-managed-key list --tenant-id YOUR\_TENANT\_ID --output table
Get
Provides detailed information for a particular CMEK
aura-cli customer-managed-key get YOUR\_CMEK\_ID
Configuration of Aura CLI
Aura CLI has two commands for it’s own configuration CredentalSets of Client IDs and Client Secrets that are used to authenticate with the Aura API that the Aura CLI uses to perform its own operations. ConfigAddtional configuration options for the Aura CLI, such as turning Beta features on / off
Credential
Add
Adds a set of credentials, client ID and client secret, that were obtained from the Aura Consle.
aura-cli credential add --name YOUR_LABEL --client-id YOUR_CLIENT_ID --client-secret YOUR_CLIENT_SECRET
List
Show all configured credentials that could be used by the Aura CLI
aura-cli credential list
Remove
Removes a set of credentials
aura-cli credential list --name NAME_TO_REMOVE
Use
Sets the default credentials for the Aura CLI to use
aura-cli credential use --name NAME_TO_USE
Config
There are various configuration settings that can be controlled by this command. For example, enabling beta features
List
Shows the current configuration setttings
aura-cli config list
Get
Show the value for a chosen setting
aura-cli config set SETTING\_NAME
Set
Set the value for a chosen setting
aura-cli config set SETTING_NAME SETTING_VALUE
Migrating to the new Aura CLI
Aura CLI has graduated from a Neo4j Labs project to a full Neo4j product with all of the goodness it brings. The Neo4j Labs Aura CLI will continue to be available for installation for the foreseeable future, abet without any further development. Customers are recommended to move to the new Aura CLI as soon as they are able to do so. This KB outlines what you need to consider to move the new Aura CLI
Behaviour
- The name of the CLI is now aura-cliSupport for using environmental variables has been removed as they can be visible in process listings and can be accidentally logged making them vulnerable to exposure. For sensitive values e.g Aura API client id and client secret, a secrets manager is the recommended approach. Neo4j Labs Aura CLI used plural names for commands; the new Aura CLI has singular naming for these* It is not possible to return the raw API response body with the new Aura CLI- Flags with the new Aura CLI do not have a short form and must be specified in full
Feature set
At the time of general availability, the new Aura CLI supports these new features compared to the previous Labs project* Customer managed keys
- Beta of GraphQL Data APIs
Installation
The new Aura CLI is downloaded from https://github.com/neo4j/aura-cli/releases and is available as a native binary for Windows, Linux and Mac platforms. After downloading the relevant file and extracting the executable, the new Aura CLI can be run immediately; there are no dependencies.
Commands
| Labs Aura CLI | maps to | New Aura CLI |
|---|---|---|
| config | → | config |
| credentials | → | credential |
| instances | → | instance |
| snapshots | → | instance -> snapshot |
| tenants | → | tenant |
| tenants -> get-metrics-integration | → | instance get <InstanceID> returns the URL for metrics integration |
| NEW - customer-managed-key | ||
| NEW - data-api ( beta ) |
Command & flag changes with new Aura CLI
As far as was possible, the new Aura CLI commands and their flags are the same as the Labs based Aura CLI. However, there are changes and these are described below
Config
It is not possible to remove a setting and its value although the value itself can be changed. If deletion is wanted, then remove it from the JSON configuration file Mac$HOME/Library/Preferences/neo4j/cli/config.json Windows%LOCALAPPDATA%\neo4j\cli\config.json
Create a new AuraDB
When creating an aura instance with the new Aura CLI , –memory is given as size appended with GB e.g 8GB. Previously this was just a number.
Delete an AuraDB
New Aura CLI does not prompt for confirmation when deleting an AuraDB and starts the operation immediately
Update an AuraDB
Only the id can be used to identify the AuraDB to update. The same properties can be changed as previously - it’s name and memory size
List AuraDBs
No changes
Get AuraDB instance details
Now includes the URL to obtain metrics
Tenants
No longer includes a flag to obtain metric integration information. This is now part of the details returned for an individual AuraDB. See Get AuraDB instance details
Snapshots
Management of snapshots is now a sub-command of instance and allows for their creation, listing and obtaining their details. Restoration of a snapshot is performed by using aura-cli instance overwrite command.
Feedback
Any feedback is reported using GitHub issues. This covers requested enhancements, defects that you may encounter and general feedback.